WordPress/IndieMark
This article is a stub. You can help the IndieWeb wiki by expanding it.
WordPress IndieMark instructions were a standardized way for developers to look at and evaluate getting started with IndieWeb using WordPress using IndieMark as a means of benchmarking their progress.
They previously existed at Getting Started on WordPress, which has since been reworked as a more basic method for getting started with WordPress.
By using WordPress on your own domain, you are already a part of the IndieWeb. Below are some suggestions to help you get started with upgrading your WordPress site to support IndieWeb philosophies.
To get a domain and web hosting service, see:
Overview
These relatively short instructions are targeted at roughly the level of Generation 2 or Generation 3 indieWeb users.
If you've got the ability to set up WordPress yourself (or find the documentation online, e.g. Tutorial: Set up an IndieWebSite using WordPress on the Amazon cloud and are able to follow it), you should be able to follow the following documentation to add a lot of additional IndieWeb functionality to your site in a short amount of time.
If you've got a self-hosted WordPress site already up and running, installing & configuring some additional plugins will be even easier.
In addition to the specifics below there are some additional video/pencast resources that are particular to WordPress and IndieWeb which are geared toward beginners which may be helpful when initially setting up one's site:
- 2018-05-01
 Chris Aldrich A pencast overview (with audio and recorded visual diagrams) of IndieWeb technologies
 - 2018-04-27
 Chris Aldrich Setting up WordPress for IndieWeb Use
- Includes a walkthrough of installing some of the basic
IndieMark
The instructions below roughly follow the step by step approach of IndieMark. Because IndieMark is particularly useful for developers building a personal site from the ground up and some bits of related functionality fall into different levels, some parts of the following details won't necessarily follow them religiously.
As most people on the internet are aware, these steps are by no means the only ways to do these things, but below are the most general and relatively standardized recommendations for beginners or even very advanced users who would like to get started very quickly. Additional documentation can be found within the other WordPress related pages as well as within IndieWeb examples throughout the wiki for those who would like to extend, improve, or further automate the functionalities described below.
Prerequisites
For the sake of this document, we'll presume you've got a domain name already set up with hosting and have installed WordPress on it. There are a huge number of sites which can help with these portions if you need them. A good place to start if you do need help is Download WordPress from WordPress.org. Most hosting companies provide detailed installation instructions if not one button installations as well.
Some of indieweb philosophy is about building/adding what is useful to you, so if you don't need or want pieces of functionality, please feel free to skip sections as necessary, though be aware some portions may be prerequisites. Users are also welcome to try other methods of attack, some of which are enumerated at Advanced WordPress Set Up, in other WordPress related pages, or spread throughout the wiki on topic pages. Naturally, everyone is welcome to try their hand at writing their own code and self-dogfooding their work. Most, if not all of the plugins mentioned, are open sourced and can be found on Github if one wants to contribute code or documentation, report bugs, or suggestions.
WordPress out of the Box
Because WordPress is such a robust and developed content management system with a long history on the internet, it provides many of the levels of IndieMark out of the box. These include:
- Level 1
- Simply installing WordPress on your own domain means you own your own personal domain and have a presence on the web
- You have the ability to easily and immediately begin publishing your own posts
- Permalinks are built into the system
- As long as you checked the box during set up, robots are able to index your site
- Content can be posted in HTML
- Site-specific searchability is enabled
- Level 2
- UI for searching your posts
- Multiple post types including: articles, notes, bookmarks, photos, videos, audio
- Simple linear previous/next navigation between posts (possibly theme dependent)
- Level 3
- Search: show search results on your own site
Below, we'll discuss adding the additional pieces which weren't included out of the box.
As you complete steps, try plugging your site into indiewebify.me. It will give you instant feedback, confirming that it's working or helping you fix it if not.
Microformats and Themes
Some of the most basic functionality within the IndieWeb community is enabled by the use of microformats which are semantic classes added to HTML tags. While one doesn't need to know much, if anything, about microformats, suffice it to say that they're relatively important and they are handled primarily by one's WordPress theme. Because there are currently not many WordPress themes which properly implement microformats, we highly recommend starting out using either Sempress or Independent Publisher which do an excellent job of integrating microformats version 2.
IndieMark Level 1
Identity
Indieweb Plugin
The Indieweb Plugin is a plugin with an installer interface that includes a bundle of several useful related standalone plugins that can help you quickly get set up to be a more active member of the Indieweb. Many of these plugins will be described below. Others may be described at WordPress/Plugins or on their own pages.
Rel-me
One of the first things you will want to set up are rel-me links to your other profiles on the web. This will enable web-sign-in and IndieAuth using your domain as your identity. You can then sign into this wiki and begin wikifying.
Self-hosted WordPress
The easiest way to add rel="me" support to your site is to install the Indieweb Plugin. This will add several common social media site fields to your "Edit User" page in the admin panel at yoursite.example.com/wp-admin/profile.php. (Be sure to change this URL to include your particular domain.) Fill in these with the usernames for your identities on the various services you use (Telephone, Github username, Twitter username (without @), Facebook ID, Last.fm username, Instagram username, Flickr username) and the plugin will create the proper (invisible) rel-me links in the head of your site. There is a field at the bottom of the "Edit User" page that one can list additional URLs for adding rel-me to as well. The rel-me and WordPress with Bridgy#Rel-me links pages can provide additional information if necessary.
If you view the source for your website afterwards, you'll see a number of links like <link rel="me" href="https://twitter.com/username" /> in the <head>. If you want the links to be visible on your site, you can use the rel-me widget, which will replace the hidden links with icons.
Now that your site has rel-me links pointing to your presences on several services, log into those services and include the URL of your site in the appropriate website fields of your profile so that they point back to your website in return. Having the ability to add rel-me links in your sites helps to indicate your ownership of them.
Some services like Twitter and Instagram, which only allow one URL in your profile, support putting a second URL into your bio field if you have second personal site. Examples:  Kevin Marks and
  Chris Aldrich have indiewebified primary and secondary sites.
If your site has multiple Wordpress users, and you want to use it as an Indieweb site for one of the users, change the Indieweb identity settings in its "Options" pane:
- click IndieWeb in the admin sidebar
- click Options under the IndieWeb item in the admin sidebar
- In the main window:
- Check: Single Author Site [x]
- Pick yourself in Default Author _____v drop down menu.
- Save Changes
You can now test your rel-me setup with: IndieWebify.Me Web Sign In validator
Nota bene: In late July 2016, IndieWebify.Me was having problems which may cause it to return incorrect results. If you think this may be the case, you can do an additional test described in "Authentication" below.
Hosted at WordPress.com
If you're on the Business plan or higher, you can use the same plugin as above. If not, you'll need to use the WordPress menu and widget system.
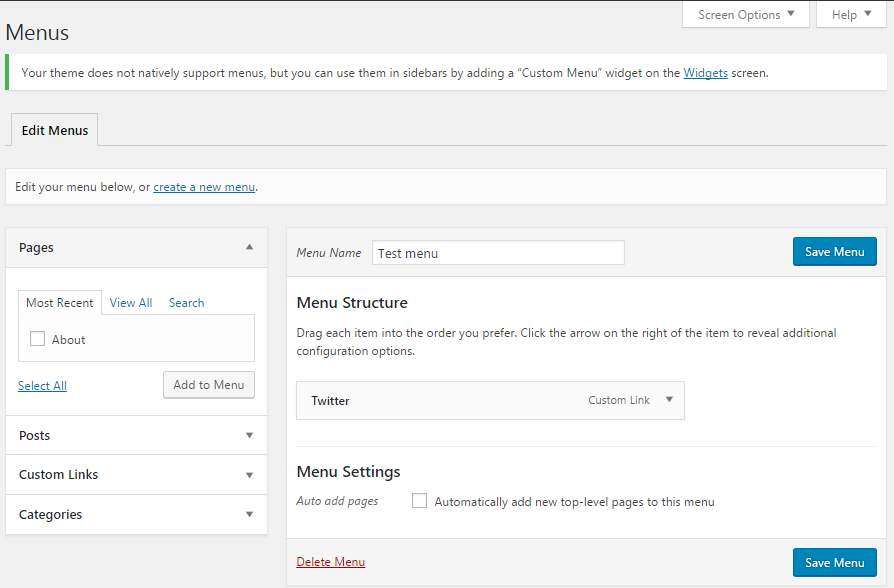
- In the admin, go to Appearance > Menus
- Create a new menu
- Click Screen Options at the top and check the box to display Link Relationships (XFN)
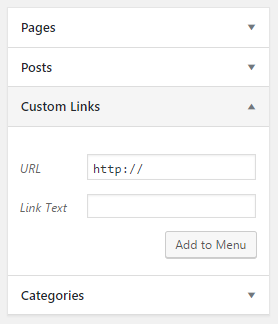
- Click Custom Links and add the link to your profile, e.g https://twitter.com/username. Enter the link text and click Add to Menu. Repeat for as many profile links as you want to add.
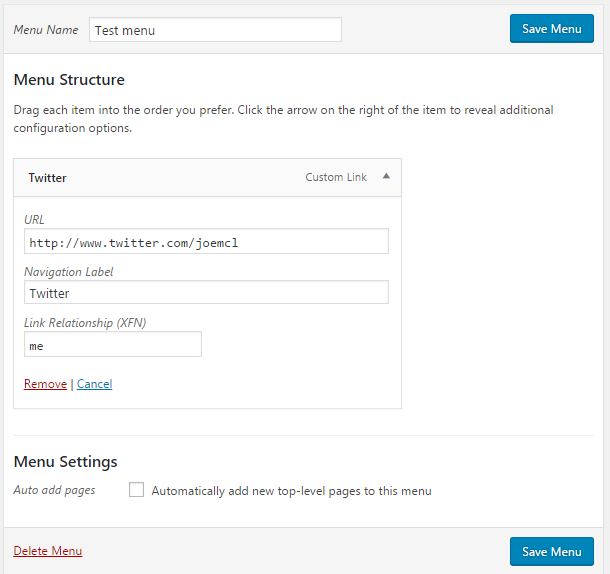
- Under Menu Structure click the arrow beside the newly-added link. In the Link Relationship (XFN) field enter me and click Save
- Go to Appearance > Widgets
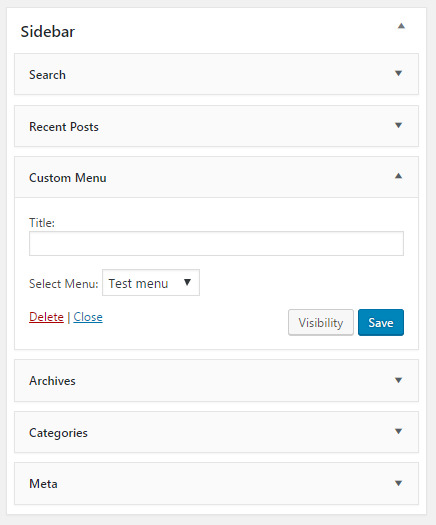
- Drag a Custom Menu widget into the Sidebar
- Click the arrow to expand the Custom Menu, select the menu you created, then click Save
- Your profile links should now appear in your sidebar, or wherever your theme places the widget.
Authentication
As an additional test you should now be able to use your domain name to log into this wiki using your domain name. You'll be redirected to an IndieAuth page which will present you with a list of supported providers for login.
You can then begin wikifying yourself and the rest of the site here.
IndieAuth Plugin
Via the Indieweb Plugin or from the WordPress repository, you can install and activate the IndieAuth Plugin.
It offers two different functions. It can act as an IndieAuth endpoint to third-party sites, alowing you to use your WordPress credentials to authenticate to other sites, or authorize them to log in on your behalf(such as posting clients). Or it supports web sign-in(using your domain) into your site using a third-party site.
IndieMark Level 2
Identity
Next you'll want to add an h-card to your homepage. An h-card can be thought of as the internet version of a business card or name card. Typically it will have your name, a photo, and some contact information. Like a business card, you can pick and choose what details to put on it.
The quickest way to create one is to fill in all of the public facing personal details you'd like to present in your h-card at http://YOURSITE.COM/wp-admin/profile.php. Next, on your widgets configuration page (http://example.com/wp-admin/widgets.php), place the "H-Card Widget" in an agreeable sidebar, footer, other available location for your theme. Configure the few options for the widget if necessary.
Alternately, you might use the h-card creator to create the mark up for your card and place it in a widget or on a particular page.
Post Types
To quickly and easily support a broad array of post types (with the correct microformats) install the Post Kinds plugin (also bundled in the Indieweb plugin). The following post types are supported natively: article, reply, repost, like, favorite, bookmark, photo, listen, watch, wish, play, jam, read, and mood with others forthcoming in future development work. The plugin's admin interface is simple and intuitive and auto-scrapes data from sites for post types that use an input URL. It also employs oEmbed well in the post too.
POSSE
"Post on your own site, syndicate elsewhere" is a cornerstone of the IndieWeb community. There are literally dozens of ways to implement it. The quickest and easiest of them is to enable WordPress's JetPack plugin and configure the Publicize module within it to syndicate your content quickly to the common silos like Twitter, Tumblr, and LinkedIn. There's even a simple checkbox interface in the admin UI for choosing which silos you'd like to syndicate to. (Alternate POSSE plugins and methods can be found at WordPress/Plugins#POSSE Plugins.)
Syndication Links
A POSSE workflow is always nicer when one can provide links on one's site to the syndicated copies. The quickest way to do this is to install and activate Syndication Links which is also included in the IndieWeb plugin. This plugin provides a text box in the admin UI for posts which one can include the permalinks of the POSSE copies of one's original content. These permalinks are automatically properly wrapped in the appropriate microformats for other services to do original-post-discovery. Options in the plugin allow one to choose between text and either a color or black/white icon set for display. The plugin also has code for automatically importing/storing these permalinks based on other POSSE plugins including support for SNAP as well as Tumblr CrossPoster, WordPress CrossPoster, Diaposter (for Diaspora), Medium, and Mastadon AutoPoster. Integrations may be possible with other POSSE plugins on request. Unfortunately, this doesn't extend to the JetPack suggestion above due inability to retrieve the URL, so one will need to copy and paste the POSSE urls into Syndication Links manually. But then again, manual until it hurts is often worthwhile.
IndieMark Level 3
Webmentions
@Mentions, the ability for one webpage or post to let another know the first has linked to the second, were popularized by Twitter, but are also built into services like Facebook and Medium. Unfortunately these mentions only work within the specific site and do not inter-operate from site to site.
In IndieWeb, we use an open protocol called webmention, which is a W3C recommendation, to allow independently operated sites to interact with each other just the way @mentions do on Twitter and other services. For those familiar with pingbacks or trackbacks in WordPress, webmentions are very similar, but are more secure, robust, and, importantly, display much better.
To enable this functionality the Webmention Plugin allows you to both send and receive webmentions by adding support to WordPress. Mentions sent to your site will show up as comments to posts or pages on your site. To use it you will want to install and active both the Webmention Plugin (for basic webmention functionality) and the Semantic Linkbacks plugin(which will handle making the webmentions format properly within your comments section).
Configuration
Neither of the two plugins requires any real configuration as the defaults are generally used by most.
The Webmention plugin respects the Discussion settings about Notifying other blogs when they are mentioned, but also has its own settings page which can be configured. These are generally self-explanatory and are as follows:
- Disable self-pings on the same URL (for example "http://example.com/?p=123")
- Disable self-pings on the same Domain (for example "example.com")
- Enable Webmention Support for Pages (otherwise Webmention is only set up for posts)
- Automatically approve Webmention from these domains (to auto approve by incoming domain)
- Show a Webmention form at the comment section, to enable manual pings. (This shows a small UI box at the bottom of your posts/pages to let people who don't have webmention enabled to manually send you webmentions.)
- Customize the explanatory text for the form
- Set a page for mentions of the homepage to be sent to
- Show avatars on webmentions when possible
For homepage webmentions, some people prefer not to show them as comments there, but on a separate mentions page. If this is the case, one should create a new page with an appropriate name (many use "Mentions"), designate it as public or private depending on your preference, and save it. Then revisit the settings page above and select that page name from the dropdown menu. Now when people send webmentions to your home page, they will be collected at the designated page.
Semantic Linkbacks has settings to display mentions as Facepiles.
WebSub
Naturally one wants a better way to tell the world when one updates one's site with a new post. This is best done with WebSub (fka PubSubHubbub) (PuSH) support for posts and it can be handled by installing and activating the PubSubHubbub plugin. No configuration is really necessary as it comes preconfigured with custom hubs Superfeedr at http://pubsubhubbub.superfeedr.com and http://pubsubhubbub.appspot.com. Others could be added if desired.
IndieMark Level 4
Handling Responses
One would generally like to have one's site be able to handle responses from other sites. Toward this end, one wants to be able to receive webmentions and display comments on every post type you publish. The webmention plugin discussed above handles both the sending and receiving of webmentions, so that is already covered. To better display these received webmentions one wants to install and activate the following plugin:
- Semantic Linkbacks - makes indieweb comments look better on your site, recognizing them as being likes, replies, etc. and displaying appropriately.
Accept Backfeed
In addition to sending one's content to silos, ideally one would also like to accept comments, replies, likes, and other replies to these copies back on one's own site. This is known in the IndieWeb community as backfeed.
The easiest way to implement backfeed on WordPress is to support webmentions (enabled above) and have properly configured rel-me links (see above) and connecting one's site to Bridgy. Bridgy then handles crawling one's siloed copies, finding the original posts, and then sending webmentions so those posts to appear as comments. Detailed instructions for doing this are laid out separately at WordPress with Bridgy.
Next Steps
These basic steps will take one's site a long way towards supporting some of the most common and powerful IndieWeb technologies that currently exist.
Naturally, there are alternate ways of adding some of the functionalities described above using alternate methods or plugins. Some of these can be found on the Advanced_WordPress_Set_Up page, within WordPress/Plugins, on other related WordPress pages, or within other parts of the wiki. Further, many pages in the wiki include examples of functionality, UI/UX, and even brainstorming for ideas that continue to extend the value and power of the independent web. We invite you to explore and experiment to help create the internet you'd like to have for yourself.
FAQ
- Why does the comment on my site not show the author's information?
- Why does the comment show a link to bridgy.appspot.com instead of the social network?
- Please ensure that you have both the Webmention plugin and the Semantic Linkbacks plugin installed.
- WordPress seems to be blocking Bridgy
- The WordPress service in Bridgy is only meant for people using lower tier plans on WordPress.com who can't install the indieweb plugins from WordPress.org (or GitHub) themselves on their own server. If you're using WordPress.org self-hosted code, then you just need to connect Brid.gy to your social media sites (Twitter, Facebook, etc.)
- Where can I find help or assistance with adding Indieweb technology to my WordPress installation?
- Try the WordPress_Outreach_Club or ask your question in the IRC channel. If you think you've found a bug, feel free to file an issue in the github repository for the particular plugin you're having problems with.
See Also
- WordPress
- Why
- Getting Started
- IndieMark
- WordPress Glossary Site has definitions of basic WordPress and web related terms, many of which are also covered on the wiki here as well.


